Oracle Data Service Integrator Documentation > Data Services Developer's Guide
How To Create Your First Data Services
Creating a data service from scratch — as you will if you follow this tutorial — is a good way to get the feel of working with Workshop for WebLogic, as well as other aspects of data services. In the process a logical data service you will also automatically create several physical data services. Physical data services represent physical data sources.
Topics
- Goal of the Tutorial
- Creating a Dataspace Project
- Creating Physical Data Services
- Creating a Logical Data Service
- Creating, Saving, and Associating the XML Type
- Testing Your Data Service Function
- Adding Create-Update-Delete Functions to Your Data Service
- Updating Your Results
- Reviewing the Query Plan
- Reviewing the Update Map
- Archiving Your Project
- Summary
Goal of the Tutorial
The goal of this tutorial is to illustrate an approach to creating a logical data service, including creating an XML Type (schema), using Workshop for WebLogic. Along the way you will use many of the facilities:
- Drag-and-drop Query Map
- Source Editor
- Test Editor
- Query Plan
- Update Map
This example uses data provided with the Retail Dataspace Sample Application (RTLApp).
Requirements
The requirement for the demonstration project are to develop a logical data service from several physical data services. When run by a client, the data service will return a consolidated view of a particular customer's orders, as well as all the items in each order.
Before You Begin
Before you can begin the tutorial make sure you:
- Properly install Oracle Data Service Integrator.

Reference:
Oracle Data Service Integrator Installation Guide - Configure the Retail Dataspace Sample Application.
- Have the application open in Workshop for WebLogic and the Oracle Data Service Integrator-enabled Oracle WebLogic 10.3 server running.
Also describe in Configure the Retail Dataspace Sample Application.
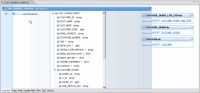
Oracle Data Service Integrator Default Perspective After Adding myDataspace

| Tip: Click on image to view it enlarged in a separate window. |
Creating a Dataspace Project
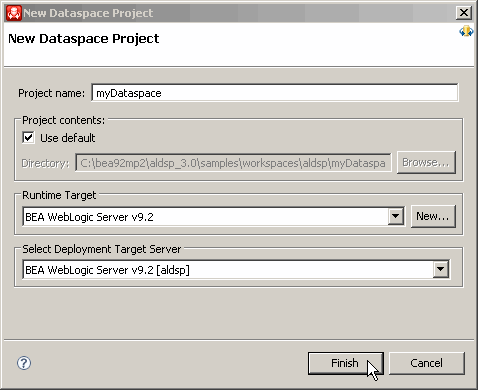
Data services are created within Workshop for WebLogic as Eclipse projects, called dataspace projects. With the Oracle Data Service Integrator-enabled server running, the first step is to create a new dataspace project.
- From the menu select:
File > New > Dataspace Project
- Give your project a name such as:
myDataspace

Creating a New Dataspace Project
Set Up a Folder for Physical Data Services
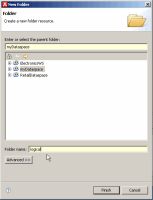
Data services are typically created inside project folders. The recommended first step in creating one or several data services is to create containers (folders).
In this tutorial two folders will be created:
- One for physical data services.
- One for logical data services.
- In the Project Explorer window right-click on myDataspace, choose:
New > Folder
- Name your folder:
logical
- Create another folder under myDataspace named:
physical
Physical data services represent physical data such as tables in relational databases or web services. Logical data services are build upon existing physical or logical data services.Creating a New Folder
- Right-click on your new physical folder and choose:
New > Physical Data Service

Creating Physical Data Services
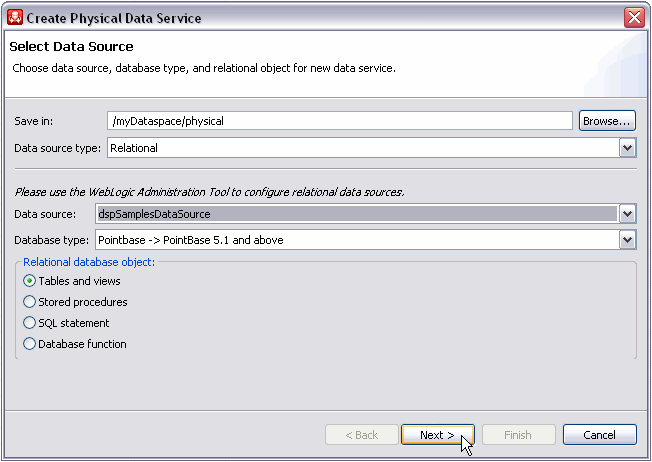
Physical data services are based on existing data sources.
Whenever you create physical data services, you must first identify the data source. Available options include:
- Relational
- Web Service
- Java Function
- Delimited Data
- XML Data
To take advantage of data provided with the sample application, a relational data source is used.
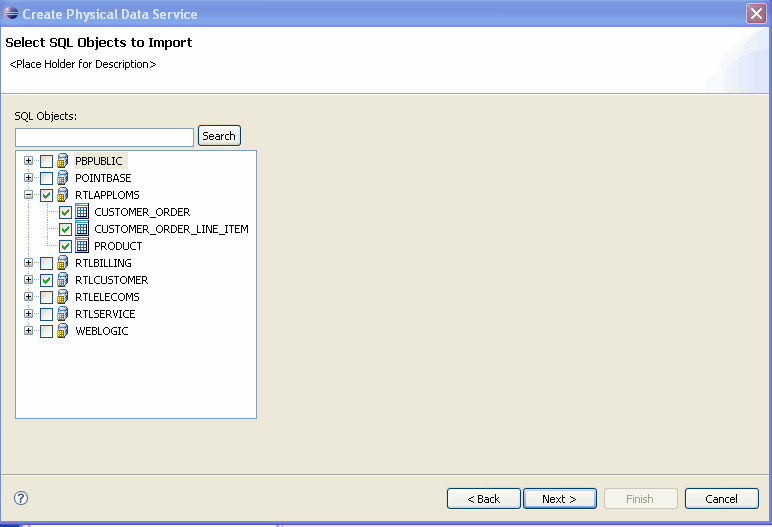
The sample databases RTLAPPLOMS and RTLCUSTOMER provided with the Retail Sample Application contain five tables. In this section you will create physical data services corresponding to those tables.
Data Sources and Data Services
| Data Source |
Name | Table |
Data Service |
|---|---|---|---|
| RTL Appliance Order Management System | RTLAPPOMS |
|
|
| RTL Customer Data |
RTLCUSTOMER |
|
|
Select a Data Source
The select a data source dialog initially allows you to select a data source type (such as relational or web service). Once that selection is made, additional options appears. The following table lists the actions required to select the relational data sources that will be used throughout this tutorial.
| Format similar to that shown in the table below is used to describes the steps needed to work through multi-page wizards. |
Setting Up Sources for Data Services
| Step | Dialog | Field/Column |
Action |
Comment |
||
|---|---|---|---|---|---|---|
| |
Select Data Source | Save in: |
|
Use default (/myDataspace/physical). |
||
| 1. | |
Data source type: |
select Relational | From dropdown list. |
||
| 2. |
|
Data source: |
select dspSamplesDataSource |
|||
| 3. |
|
|||||
| 4. |
Select SQL Sources | Select SQL objects: |
|
Expand (+ symbol to left of data source name) to see tables in the data sources. | ||
| 5. |
|
|
|
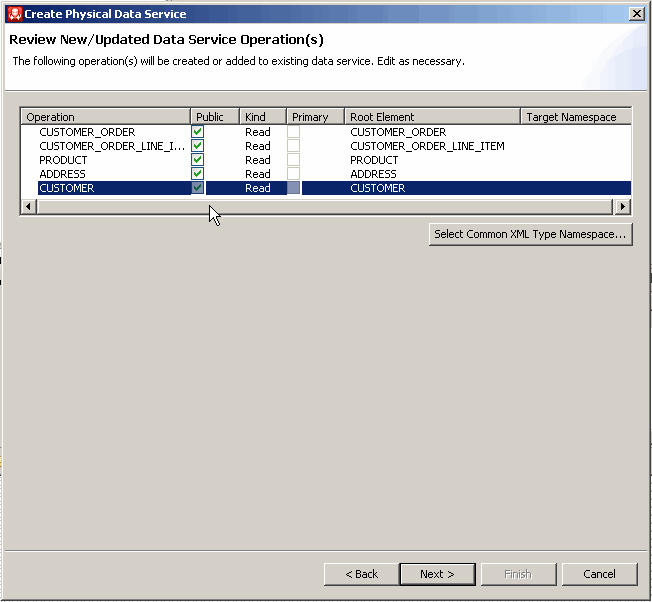
The information retrieved through introspection of relational data sources is represented as the potential creation of the five primary Read operations, as well as their containing data services. | ||
| 6. | Review New/Updated Data Service Operation(s) | Public | mark all five operations Public by clicking the checkbox in the Public column |
Public operations are available to any authorized calling application.
|
||
| 7. |
|
Select Common XML Type Namespace... button | click the button |
Because you are building up an XML Type for your logical data service from several physical data services that each have an underlying XML type, it is necessary for each type to share a namespace. |
||
| 8. |
XML Type Namspace |
Select XML Type Namespace: |
enter custOrdersItems | |||
| 9. |
|
|
Notice that the target namespace column now shows the new namespace for your operations. | |||
| 10. |
Review New/Updated Data Service Operation(s) | |
|
|
||
| 11. | Review New Data Service(s) |
|
It is necessary to modify names when:
|
|||
| 12. | Open Data Service Files | Option to open each new physical data service in Workshop for WebLogic | select No |
|

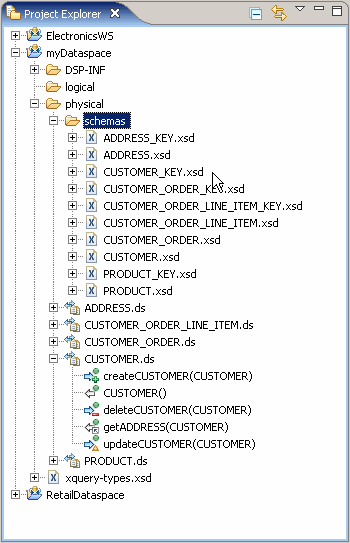
Your new data services appear in your physical folder in the Project Explorer.
Newly Created Data Services

If you expand your new data services you will see that each physical data service has been created with functions corresponding to standard relational operations. For example the CUSTOMER.ds data service contains the following operations:
- createCUSTOMER(CUSTOMER)
- CUSTOMER()
- deleteCUSTOMER(CUSTOMER)
- getADDRESS(CUSTOMER)
- updateCUSTOMER(CUSTOMER)

Some relationship operations (such as getADDRESS(CUSTOMER)) have been created automatically. This operation returns an ADDRESS type when it is passed a CUSTOMER type as a parameter. The operation can be inferred during the data service creation process because ADDRESS contains a foreign key that that is a unique custID in the CUSTOMER data service (and underlying source). Relationship functions are described in detail in the Modeling Data Services Relationships section.
Schemas Directory
You should find a schemas folder adjacent to the newly created data services. This folders contains schema files created during the metadata import process. For relational sources, schemas are created for both the data source (table or view) and the primary keys found during the introspection of the relational source. For example:
- CUSTOMER.xsd
- CUSTOMER_KEY.xsd
If you look in the schemas directory you will see that for each physical data service created, two schemas were created. One representing the physical data service and the other to describe the primary keys in the data source.
Expanded View of Project Explorer
When a logical entity data service is created, it is either:
- Associated with an existing schema or
- A return type associated with a function becomes the basis of a generated XML type that is then associated with the data service.
Publish Your Projects
Using Workshop for WebLogic, you can publish your dataspace projects to a server when it is ready for testing and debugging. Publishing is also useful during the project development phase because in its default configuration, when you publish a project in Workshop for WebLogic, it is automatically built and validated. The validation process identifies error conditions, if any.
Note: When publishing a project to a server, the project is validated and only valid projects are successfully published.
To publish your projects:
- In the Servers tab, right-click the server to which the project is to be published.
- Choose Publish from the menu.
A dialog displays the progress and, upon successful completion, the status of the server changes to Synchronized.
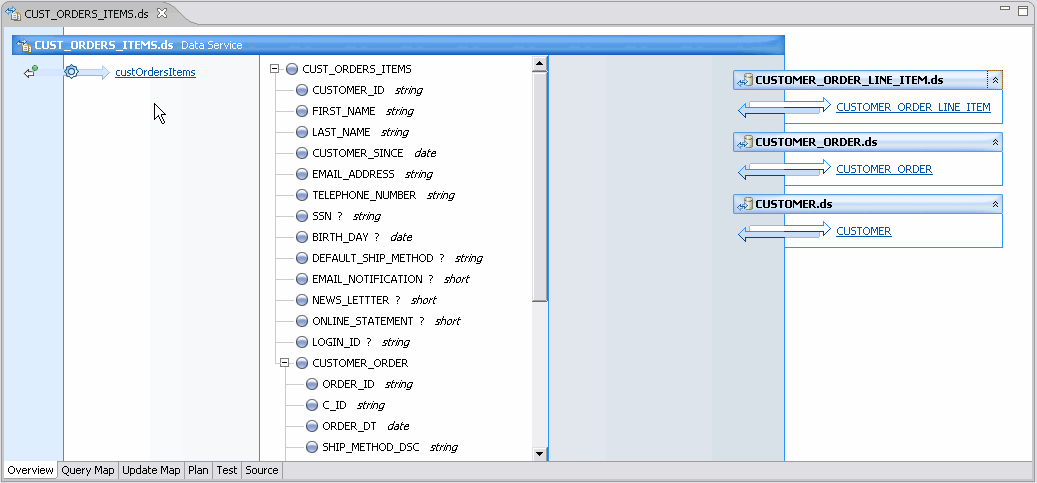
Creating a Logical Data Service
A logical data service can be thought of as a "virtual" data source. Logical data services are built upon existing physical or logical data services.
| The Oracle Data Service Integrator Retail Sample Application is a good dsource for best practices associated with creating layered data services. |
To create a logical data service:
- Right-click on the folder named logical that you previously created.
- Select:
New > Logical Data Service
- Set the data service name to:
CUST_ORDERS_ITEMS
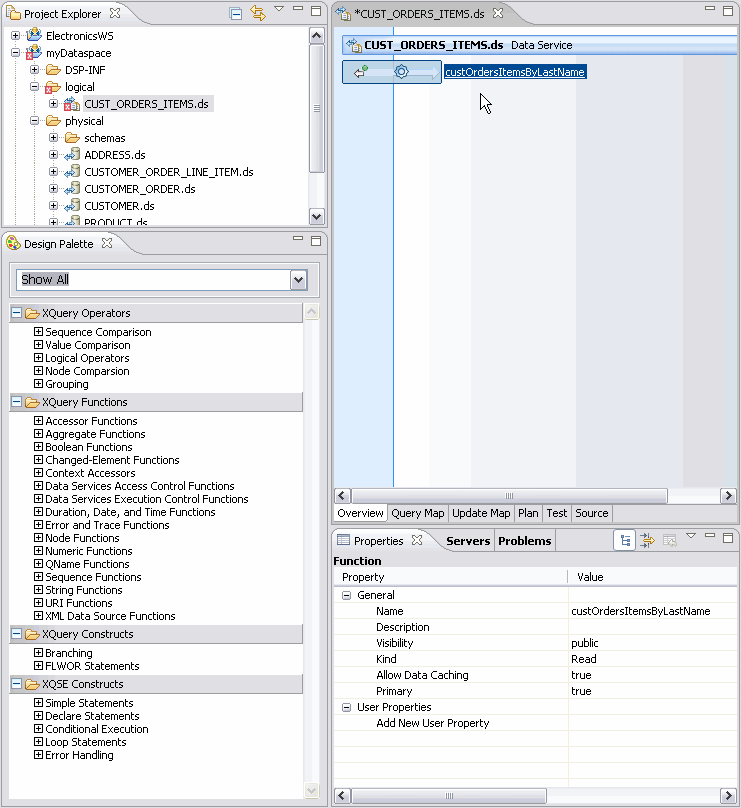
After making these selections, your new entity data service appears in Overview mode.
Since no functions have yet been added to your data service, the work area of the data service is empty.
Options available for creating and testing your new data service appear at the bottom of the workspace. In addition to Overview, you will see the following tabs:
- Query Map
- Update Map
- Plan
- Test
- Source
Attempt To Publish Your Dataspace Project
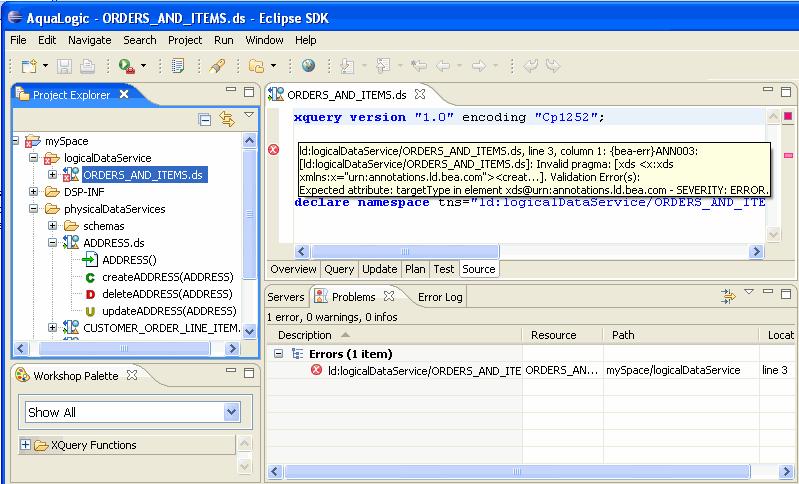
There are times when attempts to publish your data service under development will not be successful. This is expected since as you create your query in the Query Map, source is created simultaneously. (When a data service is in such a state, you will notice a red x on its associated icon in Project Explorer.)
Project After Unsuccessful Publish Effort

Unlike the previously successful publish operation, you will now get a message indicating that your project contains build errors and cannot be published. ![]()
In this case your newly created ORDERS_AND_ITEMS data service is invalid. You can verify this several ways after clicking  .
.
- Inspect your code by clicking on the Source tab.
- Double-click on the error reported in the Problems window.
- Inspect the contents of the Error log window.
Incomplete Logical Data Service Validation Error
| Although an error condition exists, you can continue creating on your data service. |
Bottom Up or Top Down
Data services can be designed from the top-down or bottom-up. The following table compares these two approaches.
Data Services Design Models
| Data Service Design Model | Description |
|---|---|
| Top-down | The new data service is based on an existing XML Type (schema) that is either drawn from an existing data service or developed externally. |
| Bottom-up | The new data service is created by:
|
This tutorial uses a bottom-up design.
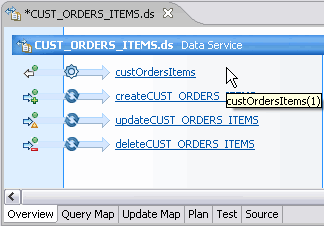
Add an Operation to CUST_ORDERS_ITEMS
The next step is to add a read function to your new data service that will return a document containing all the orders placed by a particular customer, and all the items in each order.
To add your new function:
- Select the Overview tab.
- Right-click in the CUST_ORDERS_ITEMS data service's work area.
- Choose Add Operation... from available options.
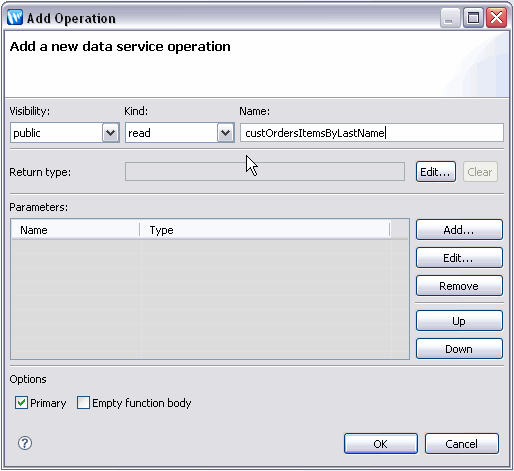
Creating a New Operation
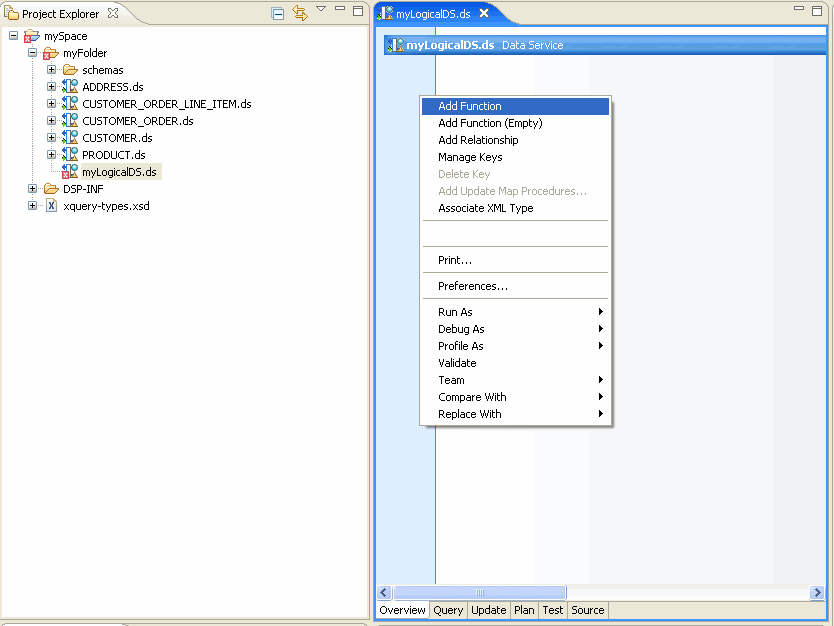
The next steps will create a publicly available Read function for your new data service.
Add Operation Dialog Options
| Step | Option | Action |
Comment/Reference |
|---|---|---|---|
| |
Visibility | |
Options are private (internal to data service), protected (from public), and public. Default setting is public. |
| |
Kind |
|
All operations are functions other than library procedures. The Read function simply retrieves information from your data source. Default operation is read. |
| 1. |
Name | custOrdersItemsByLastName |
Any valid XML name can be entered; spaces are not allowed. |
| Return Type: |
|
Bottom-up designs of a data service create the Return type in the Query Map. |
|
| Parameters: | |
Can be added here or in the Query Map. Leave unselected. |
|
| |
Options: Primary | |
Defines function as the Primary Read function in the entity data service. Default is selected. |
| Options: Empty Function Body |
|
Default is not selected. | |
| 2. |
|
Add Operation Dialog
| Every artifact and artifact element in Overview has properties. In some cases these properties — such as name and type — are either directly editable or adjustable through dropdown list boxes. The Properties window is, by default, visible in the Workshop for WebLogic perspective. If the Properties window is not visible you can retrieve it using the command:
Window > Reset Perspective |
New Data Service Operation and Properties
Building Your Query
Click on the custOrdersItemsByLastName function name in the work area to enter Query Map mode.
Initial Query View

| Changes made in the Query Map editor are immediately reflected in source and vice-versa. When there is an error is source, the Query map may not be available. You can typically correct such a condition using the Undo menu option or Ctrl-Z. Alternatively, click the Source tab and edit as needed. |
Building Your FLWR Statement Graphically
XQueries are often described as being build upon "FLWR" statements:
- For/Let
- Where
- Return
Changes made in source are immediately rendered graphically in the query map.
Adding Data Sources to Query View - the For/Let Statements
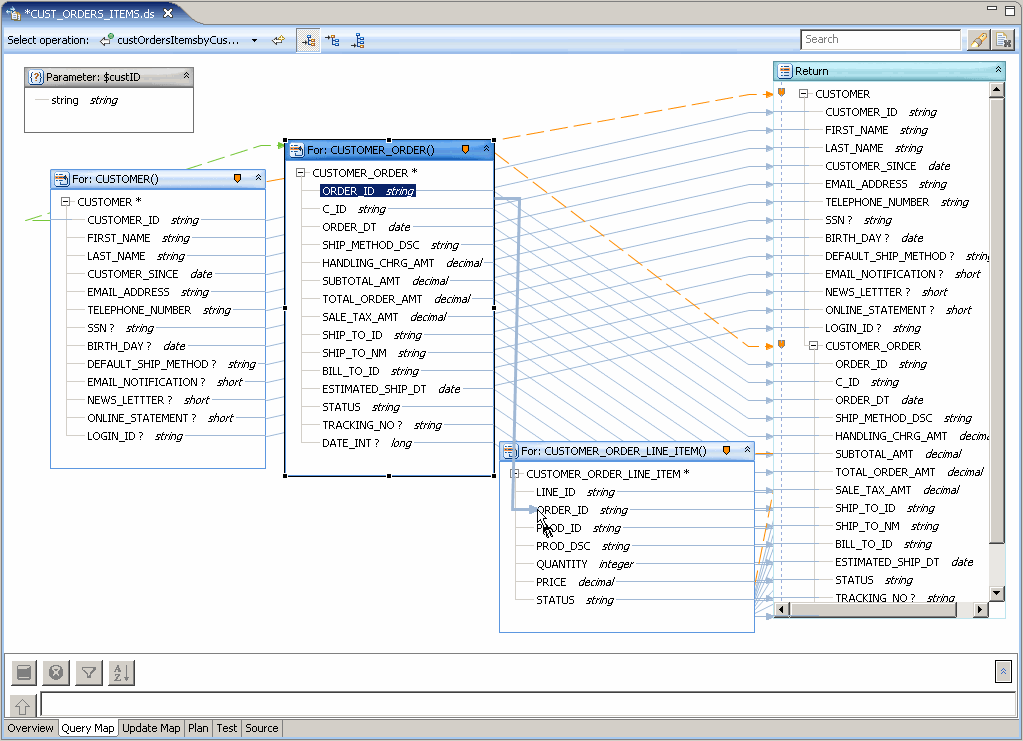
It is through the Query Map that you can bring together representations of existing data sources and associate their elements with the Return type of a new data service.
In the current example your new data service is to provide a consolidated view drawn from the CUSTOMER, CUSTOMER_ORDER, and CUSTOMER_ORDER_LINE_ITEM data services. The Read functions from these physical data services therefore need to be represented in the work area of the new data service.
Follow these steps to add these representations to your Query map:
- In the physical folder expand the following data services:
- CUSTOMER.ds
- CUSTOMER_ORDER.ds
- CUSTOMER_ORDER_LINE_ITEM.ds
- Drag and drop the Read operations of the following data services CUSTOMER, CUSTOMER_ORDER, and CUSTOMER_ORDER_LINE_ITEM into the query work area. Read operations are identified by the a white-arrow-with-green-ball icon as shown below.
![]()
Each of these operational building blocks will become for statements in the XQuery description of your new data service.
Data Source Representations in Work Area
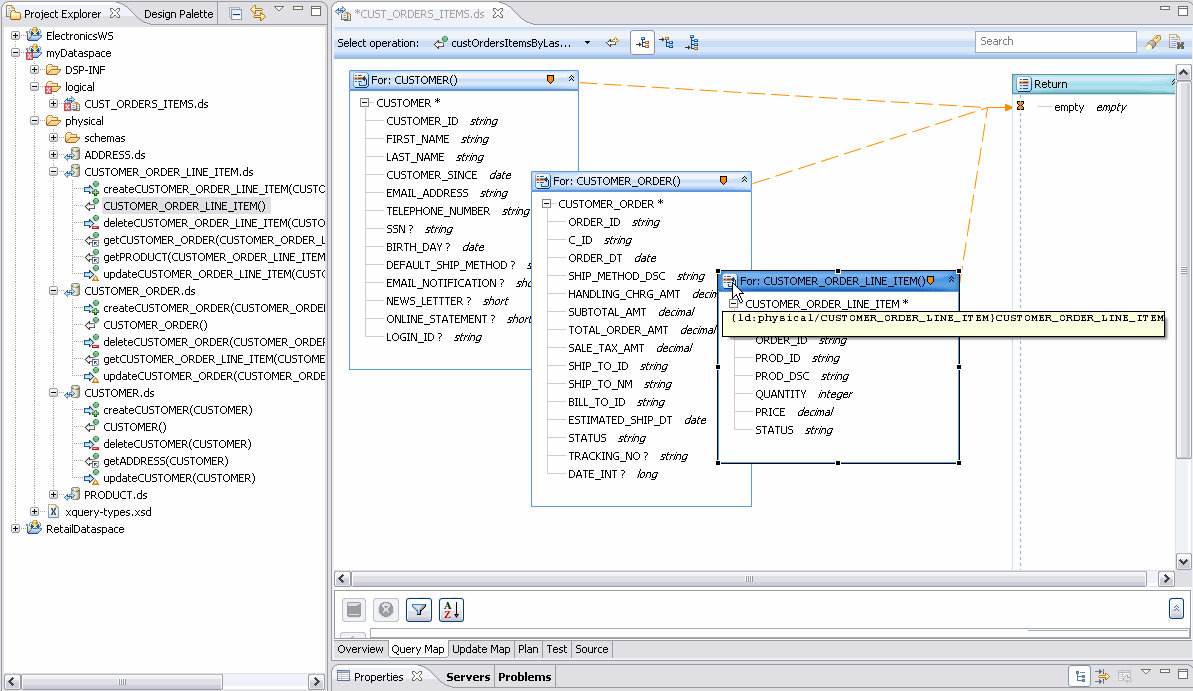
The Data Source Representations in Work Area graphic shows the artifacts useful in tailoring your query:
- Data sources are represented in three XQuery For: statements.
- The 'empty empty' element in the Return type is a placeholder for the elements and their type that will eventually be projected.
- The lines from the three statements to the empty global element in the Return type represents current scopings. By adjusting these lines when a Return type is populated you can alter the arrangement of information returned by your query. (Described below.)
Add a Parameter
Parameters can be added when your operation is created or in the Query Map. Parameters can be of simple (primitive) type or complex, such as the XMLtype from another data service.
In this case you create a single xs:string parameter that will allow retrieval of one or more records by a customer's last name.
To add a parameter:
- In the Query Map work area right-click in a blank area and select:
Edit Signature...
- If asked to save modified resources click .
- In the Parameters section click Add.
- Complete the Edit Function Signature... dialog.
Edit Function Signature Dialog Options
| Step | Field | Action |
Comment/Reference |
|---|---|---|---|
| 1. | Parameter name |
last_name |
|
| |
Parameter type |
|
xs:string is the default primitive type. |
| |
Occurance |
|
Default is One. |
| 2. |
|
||
| 3. |
|
In the Edit Function Signatures dialog. |
Add New Parameter Dialog
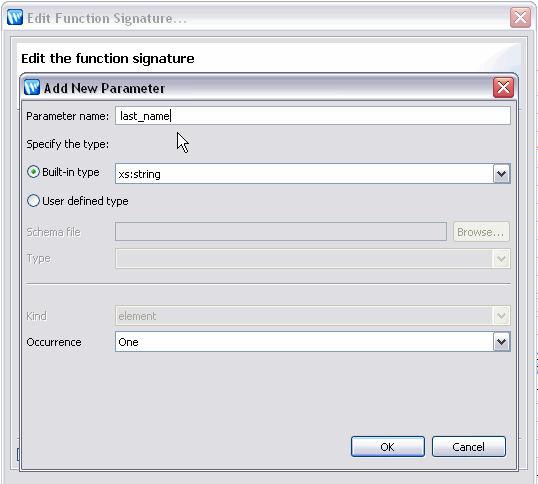
The last_name parameter appears in the work area.
Partial Source of CUST_ORDERS_ITEMS After Addition of Read Functions and last_name Parameter
xquery version "1.0" encoding "UTF-8";

(:: pragma ... ::)

declare namespace cus2= "ld:physical/CUSTOMER";
declare namespace cus1= "ld:physical/CUSTOMER_ORDER";
declare namespace ust= "custOrdersItems";
declare namespace cus= "ld:physical/CUSTOMER_ORDER_LINE_ITEM";
declare namespace tns="ld:logical/CUST_ORDERS_ITEMS";

(:: pragma ... ::)

declare function tns:custOrdersItemsByLastName(){
for $CUSTOMER in cus:CUSTOMER()
for $CUSTOMER_ORDER in cus1:CUSTOMER_ORDER()
for $CUSTOMER_ORDER_LINE_ITEM in cus2:CUSTOMER_ORDER_LINE_ITEM()
return
    ()
};
Map Elements to the Return Type
Three icons associated with projecting elements to the Return type appear above the Query Map work area. (You may need to widen your window to see all three icons.)
Mapping Mode Icons
| Icon | Mapping Mode |
Keyboard equivalent | Description |
|---|---|---|---|
| |
Value |
None. |
Maps simple or complex elements to identical values in the Return type. For example, a simple element can be projected to a comparable simple element in the Return type. |
| |
Overwrite |
Ctrl-Drag object |
Overwrites simple or complex element in the Return type with the selected simple or complex element. |
 |
Append |
Ctrl-Shift-Drag object |
Maps simple or complex object as a child to the Return type element it is associated with. |
You will use these options to map representations of source data to the Return type of your new data service.
Populating the Return Clause
- From the three mapping icons in the Select operation line at the top of the query map select the second of the three icons, Overwrite mapping (
 ).
). - Drag the CUSTOMER complex element:
CUSTOMER*
over the global element placeholder labeled "empty" in the Return type.
Mapping Complex Element to Return Type

- Right-click on the new CUSTOMER element in the Return type and select:
Expand Complex Mapping
Expanding Complex Mapping

This gesture is a shortcut for drawing lines from each element in the for statement to the Return type. This gesture is also necessary if you want to add a complex child element to the type. Notice that individual mapping lines now connect each element in the For: node with an element in the Return type. Individual mappings can be added or deleted using drag-and-drop or the Delete key, respectively.
The next steps will add elements from the CUSTOMER_ORDER data service to your Return type.
- Select Append Mapping mode ( ).
- Drag the CUSTOMER_ORDER complex element:
CUSTOMER_ORDER*
over the CUSTOMER element in the Return type. Notice that the CUSTOMER_ORDER global element and the names of its children now appear after the CUSTOMER elements.
- Expand complex mapping for the CUSTOMER_ORDER global element.
- From the work area drag the CUSTOMER_ORDER_LINE_ITEM complex element over the CUSTOMER_ORDER element in the Return type.
- Expand complex mapping for these elements.
Adding Child Elements to Return Type

Set Statement Scoping
Click the Source tab to inspect your generated code. Notice that the Return type contains all three For: statements.
Function cust_orders_items_byLastName(string) in Source View
declare function tns:custOrdersItemsByLastName($last_name as xs:string) {
for $CUSTOMER in cus:CUSTOMER()
for $CUSTOMER_ORDER in cus1:CUSTOMER_ORDER()
for $CUSTOMER_ORDER_LINE_ITEM in cus2:CUSTOMER_ORDER_LINE_ITEM()
return
    <ust:CUSTOMER>
        <CUSTOMER_ID>{fn:data($CUSTOMER/CUSTOMER_ID)}</CUSTOMER_ID>
        <FIRST_NAME>{fn:data($CUSTOMER/FIRST_NAME)}</FIRST_NAME>
        <LAST_NAME>{fn:data($CUSTOMER/LAST_NAME)}</LAST_NAME>
        <CUSTOMER_SINCE>{fn:data($CUSTOMER/CUSTOMER_SINCE)}</CUSTOMER_SINCE>
        <EMAIL_ADDRESS>{fn:data($CUSTOMER/EMAIL_ADDRESS)}</EMAIL_ADDRESS>
        <TELEPHONE_NUMBER>{fn:data($CUSTOMER/TELEPHONE_NUMBER)}</TELEPHONE_NUMBER>
        <SSN?>{fn:data($CUSTOMER/SSN)}</SSN>
        <BIRTH_DAY?>{fn:data($CUSTOMER/BIRTH_DAY)}</BIRTH_DAY>
        <DEFAULT_SHIP_METHOD?>{fn:data($CUSTOMER/DEFAULT_SHIP_METHOD)}</DEFAULT_SHIP_METHOD>
        <EMAIL_NOTIFICATION?>{fn:data($CUSTOMER/EMAIL_NOTIFICATION)}</EMAIL_NOTIFICATION>
        <NEWS_LETTTER?>{fn:data($CUSTOMER/NEWS_LETTTER)}</NEWS_LETTTER>
        <ONLINE_STATEMENT?>{fn:data($CUSTOMER/ONLINE_STATEMENT)}</ONLINE_STATEMENT>
        <LOGIN_ID?>{fn:data($CUSTOMER/LOGIN_ID)}</LOGIN_ID>
        {
                <ust:CUSTOMER_ORDER>
                    <ORDER_ID>{fn:data($CUSTOMER_ORDER/ORDER_ID)}</ORDER_ID>
                    <C_ID>{fn:data($CUSTOMER_ORDER/C_ID)}</C_ID>
                    <ORDER_DT>{fn:data($CUSTOMER_ORDER/ORDER_DT)}</ORDER_DT>
                    <SHIP_METHOD_DSC>{fn:data($CUSTOMER_ORDER/SHIP_METHOD_DSC)}</SHIP_METHOD_DSC>
                    <HANDLING_CHRG_AMT>{fn:data($CUSTOMER_ORDER/HANDLING_CHRG_AMT)}</HANDLING_CHRG_AMT>
                    <SUBTOTAL_AMT>{fn:data($CUSTOMER_ORDER/SUBTOTAL_AMT)}</SUBTOTAL_AMT>
                    <TOTAL_ORDER_AMT>{fn:data($CUSTOMER_ORDER/TOTAL_ORDER_AMT)}</TOTAL_ORDER_AMT>
                    <SALE_TAX_AMT>{fn:data($CUSTOMER_ORDER/SALE_TAX_AMT)}</SALE_TAX_AMT>
                    <SHIP_TO_ID>{fn:data($CUSTOMER_ORDER/SHIP_TO_ID)}</SHIP_TO_ID>
                    <SHIP_TO_NM>{fn:data($CUSTOMER_ORDER/SHIP_TO_NM)}</SHIP_TO_NM>
                    <BILL_TO_ID>{fn:data($CUSTOMER_ORDER/BILL_TO_ID)}</BILL_TO_ID>
                    <ESTIMATED_SHIP_DT>{fn:data($CUSTOMER_ORDER/ESTIMATED_SHIP_DT)}</ESTIMATED_SHIP_DT>
                    <STATUS>{fn:data($CUSTOMER_ORDER/STATUS)}</STATUS>
                    <TRACKING_NO?>{fn:data($CUSTOMER_ORDER/TRACKING_NO)}</TRACKING_NO>
                    <DATE_INT?>{fn:data($CUSTOMER_ORDER/DATE_INT)}</DATE_INT>
                    {
                            <ust:CUSTOMER_ORDER_LINE_ITEM>
                                <LINE_ID>{fn:data($CUSTOMER_ORDER_LINE_ITEM/LINE_ID)}</LINE_ID>
                                <ORDER_ID>{fn:data($CUSTOMER_ORDER_LINE_ITEM/ORDER_ID)}</ORDER_ID>
                                <PROD_ID>{fn:data($CUSTOMER_ORDER_LINE_ITEM/PROD_ID)}</PROD_ID>
                                <PROD_DSC>{fn:data($CUSTOMER_ORDER_LINE_ITEM/PROD_DSC)}</PROD_DSC>
                                <QUANTITY>{fn:data($CUSTOMER_ORDER_LINE_ITEM/QUANTITY)}</QUANTITY>
                                <PRICE>{fn:data($CUSTOMER_ORDER_LINE_ITEM/PRICE)}</PRICE>
                                <STATUS>{fn:data($CUSTOMER_ORDER_LINE_ITEM/STATUS)}</STATUS>
                            </ust:CUSTOMER_ORDER_LINE_ITEM>
                    }
                </ust:CUSTOMER_ORDER>
        }
    </ust:CUSTOMER>
};
| The current query is — in relational terminology — a cross-product or a Cartesian join. Such queries when run are very CPU intensive. In the case of this example, scoping and joining should occur before the query is run. |
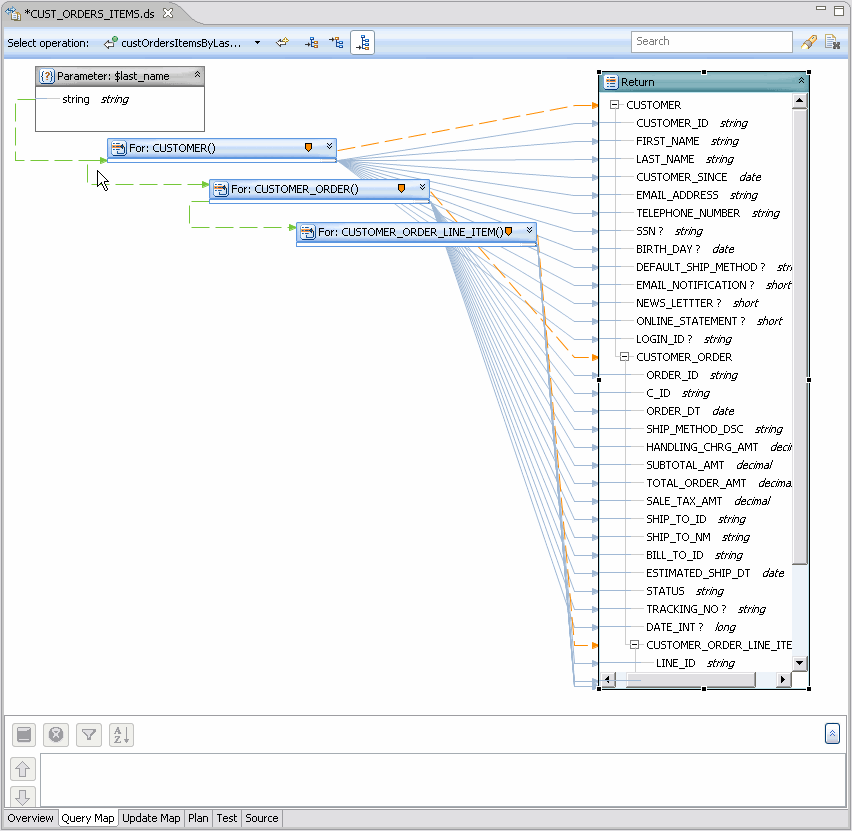
Using the Query Map you can adjust this quite easily by changing the scoping of the subordinate data services in the Return type, as shown in the following steps.
Adjusting Scoping Rules in the Return Type

- Return to Query Map mode.
- With your mouse select the zone icon (
 ) in the node:
For: $CUSTOMER_ORDER()
- Drag the zone icon over the corresponding CUSTOMER_ORDER element in the Return type.
Notice that the zone line from the CUSTOMER_ORDER node moves to the subordinate complex type (CUSTOMER_ORDER). - Drag the zone icon of CUSTOMER_ORDER_LINE_ITEM to its corresponding element in the Return type.
Nested Zoning in the Return Type

Switch to Source view to verify that the for statements are nested in the Return clause. Now, when a parameter is passed with the operation, all the customers with a particular last name will be returned which contains orders and order line items associated with that customer.
Source View of Return Type with Nested Return Types
declare function tns:custOrdersItemsByLastName($last_name as xs:string) {
for $CUSTOMER in cus:CUSTOMER()


return
    <ust:CUSTOMER>
        <CUSTOMER_ID>{fn:data($CUSTOMER/CUSTOMER_ID)}</CUSTOMER_ID>
        <FIRST_NAME>{fn:data($CUSTOMER/FIRST_NAME)}</FIRST_NAME>
        <LAST_NAME>{fn:data($CUSTOMER/LAST_NAME)}</LAST_NAME>
        <CUSTOMER_SINCE>{fn:data($CUSTOMER/CUSTOMER_SINCE)}</CUSTOMER_SINCE>
        <EMAIL_ADDRESS>{fn:data($CUSTOMER/EMAIL_ADDRESS)}</EMAIL_ADDRESS>
        <TELEPHONE_NUMBER>{fn:data($CUSTOMER/TELEPHONE_NUMBER)}</TELEPHONE_NUMBER>
        <SSN?>{fn:data($CUSTOMER/SSN)}</SSN>
        <BIRTH_DAY?>{fn:data($CUSTOMER/BIRTH_DAY)}</BIRTH_DAY>
        <DEFAULT_SHIP_METHOD?>{fn:data($CUSTOMER/DEFAULT_SHIP_METHOD)}</DEFAULT_SHIP_METHOD>
        <EMAIL_NOTIFICATION?>{fn:data($CUSTOMER/EMAIL_NOTIFICATION)}</EMAIL_NOTIFICATION>
        <NEWS_LETTTER?>{fn:data($CUSTOMER/NEWS_LETTTER)}</NEWS_LETTTER>
        <ONLINE_STATEMENT?>{fn:data($CUSTOMER/ONLINE_STATEMENT)}</ONLINE_STATEMENT>
        <LOGIN_ID?>{fn:data($CUSTOMER/LOGIN_ID)}</LOGIN_ID>
        {

                for $CUSTOMER_ORDER in cus1:CUSTOMER_ORDER()
                return
                <ust:CUSTOMER_ORDER>
                    <ORDER_ID>{fn:data($CUSTOMER_ORDER/ORDER_ID)}</ORDER_ID>
                    <C_ID>{fn:data($CUSTOMER_ORDER/C_ID)}</C_ID>
                    <ORDER_DT>{fn:data($CUSTOMER_ORDER/ORDER_DT)}</ORDER_DT>
                    <SHIP_METHOD_DSC>{fn:data($CUSTOMER_ORDER/SHIP_METHOD_DSC)}</SHIP_METHOD_DSC>
                    <HANDLING_CHRG_AMT>{fn:data($CUSTOMER_ORDER/HANDLING_CHRG_AMT)}</HANDLING_CHRG_AMT>
                    <SUBTOTAL_AMT>{fn:data($CUSTOMER_ORDER/SUBTOTAL_AMT)}</SUBTOTAL_AMT>
                    <TOTAL_ORDER_AMT>{fn:data($CUSTOMER_ORDER/TOTAL_ORDER_AMT)}</TOTAL_ORDER_AMT>
                    <SALE_TAX_AMT>{fn:data($CUSTOMER_ORDER/SALE_TAX_AMT)}</SALE_TAX_AMT>
                    <SHIP_TO_ID>{fn:data($CUSTOMER_ORDER/SHIP_TO_ID)}</SHIP_TO_ID>
                    <SHIP_TO_NM>{fn:data($CUSTOMER_ORDER/SHIP_TO_NM)}</SHIP_TO_NM>
                    <BILL_TO_ID>{fn:data($CUSTOMER_ORDER/BILL_TO_ID)}</BILL_TO_ID>
                    <ESTIMATED_SHIP_DT>{fn:data($CUSTOMER_ORDER/ESTIMATED_SHIP_DT)}</ESTIMATED_SHIP_DT>
                    <STATUS>{fn:data($CUSTOMER_ORDER/STATUS)}</STATUS>
                    <TRACKING_NO?>{fn:data($CUSTOMER_ORDER/TRACKING_NO)}</TRACKING_NO>
                    <DATE_INT?>{fn:data($CUSTOMER_ORDER/DATE_INT)}</DATE_INT>
                    {

                            for $CUSTOMER_ORDER_LINE_ITEM in cus2:CUSTOMER_ORDER_LINE_ITEM()
                            return
                            <ust:CUSTOMER_ORDER_LINE_ITEM>
                                <LINE_ID>{fn:data($CUSTOMER_ORDER_LINE_ITEM/LINE_ID)}</LINE_ID>
                                <ORDER_ID>{fn:data($CUSTOMER_ORDER_LINE_ITEM/ORDER_ID)}</ORDER_ID>
                                <PROD_ID>{fn:data($CUSTOMER_ORDER_LINE_ITEM/PROD_ID)}</PROD_ID>
                                <PROD_DSC>{fn:data($CUSTOMER_ORDER_LINE_ITEM/PROD_DSC)}</PROD_DSC>
                                <QUANTITY>{fn:data($CUSTOMER_ORDER_LINE_ITEM/QUANTITY)}</QUANTITY>
                                <PRICE>{fn:data($CUSTOMER_ORDER_LINE_ITEM/PRICE)}</PRICE>
                                <STATUS>{fn:data($CUSTOMER_ORDER_LINE_ITEM/STATUS)}</STATUS>
                            </ust:CUSTOMER_ORDER_LINE_ITEM>

                    }
                </ust:CUSTOMER_ORDER>

        }
    </ust:CUSTOMER>


};
Creating Joins - the Where Clauses
Where clauses satisfy either specific conditions (such as where $i=5) or join conditions such as:
where $CUSTOMER_ORDER/ORDER_ID eq $CUSTOMER_ORDER_LINE_ITEM/ORDER_ID
- Return to Query Map mode.
- To establish join conditions among your data sources, drag the specified element in one For: statement to the specified element in the target For statement:
| Source and element | Target and element |
|---|---|
| $CUSTOMER/CUSTOMER_ID | $CUSTOMER_ORDER/C_ID |
| $CUSTOMER_ORDER/ORDER_ID |
$CUSTOMER_ORDER_LINE_ITEM/ORDER_ID |
| You may need to move the For: nodes around in the work area to expose the elements. |
Setting Up a Join Condition
You can verify your first join clause by clicking on target (CUSTOMER_ORDER) object. Alternatively, you can look in Source view to verify that the new where clause is modifying the CUSTOMER_ORDER_LINE_ITEM type.
for $CUSTOMER_ORDER in cus1:CUSTOMER_ORDER() where $CUSTOMER/CUSTOMER_ID eq $CUSTOMER_ORDER/C_ID return
Associate a Parameter with a For Node
An additional necessary where condition that directs the query results to a particular customer can be created by adding a parameter to an element in a node. Parameters can be simple or complex.
This project requires use of a single parameter: last_name.
- In the Query Map drag the element:
string string
in the $last_name parameter over the LAST_NAME element in the CUSTOMER node.
A line connecting the parameter to the node will appear. This will also be reflected in the Query Map Expression editor when you click on the CUSTOMER For: node.
Mapped Parameter and Where Clause
The results of this operation can also be viewed in the Source tab.
declare function tns:custOrdersItemsByLastName($last_name as xs:string) as element(ust1:CUST_ORDERS_ITEMS)* {
for $CUSTOMER in cus:CUSTOMER() where $last_name eq $CUSTOMER/LAST_NAME
return ...
In Source you will also notice that the for statements now contain where clauses based on your graphical gestures.
for $CUSTOMER in cus:CUSTOMER()
where $last_name eq $CUSTOMER/LAST_NAME
return
...
for $CUSTOMER_ORDER in cus1:CUSTOMER_ORDER()
where $CUSTOMER/CUSTOMER_ID eq $CUSTOMER_ORDER/C_ID
return
...
for $CUSTOMER_ORDER_LINE_ITEM in cus2:CUSTOMER_ORDER_LINE_ITEM()
where $CUSTOMER_ORDER/ORDER_ID eq $CUSTOMER_ORDER_LINE_ITEM/ORDER_ID
return
...
Creating, Saving, and Associating the XML Type
Since this entity data service is being created "bottom up", it is not yet associated with an XML Type (schema).
Now that you have a Return type, however, you create a valid XML Type by saving your Return type and associating it with a namespace that is unique to the project.
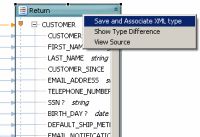
- Go to Query Map.
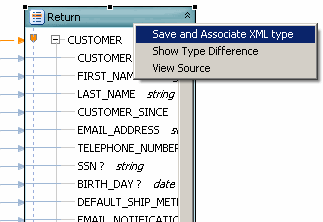
- Right-click on the Return type's title bar.
- Select Save and Associate XML type.
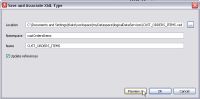
- If asked if you want to save modified resources, choose .
- In the Save and Associate XML Type dialog you will notice that the current name and namespace setting of the Return type conflicts with that of an existing type in the CUSTOMER.xsd file. Change the Name of the Return type global element from:
CUSTOMER
to:
CUST_ORDERS_ITEMS
- Leave the Update references option selected. (This option — which is by default selected — means that XML Type references in source will be updated to reflect the changes you are making.)
Save and Associate XML Type
- Click Preview. This mode shows what changes will be performed by the name change (refactoring) operation. In this case a new schema file will be created and the target type will be renamed to CUST_ORDER_ITEMS.
- Click:
- Notice that the target type (root element) in your Return type has been renamed.
- Click Overview; you will see that your entity data service is now associated with an XML type.
Newly Associated XML Type
- Publish your project. This operation should be successful.

Modifying the XML Type
When an XML Type is generated, complex elements by default return a single instance of their type (for example, one CUSTOMER_ORDER will be returned even if there are many).
In order to return all customer orders and all of each orders' line items minor changes to the data service's XML type are needed. The XML markup for this is:
maxOccurs="unbounded"
In other words, the element returns "n", any number of document fragments that meet the criteria.
To modify your new CUST_ORDERS_ITEMS XML Type:
- Click on the Overview tab, if it is not already selected.
- Right-click on the topmost element in the XML type: CUST_ORDER_ITEMS.
- Select Edit Schema. The Eclipse schema editor opens.
- Click the schema editor's Source tab (below the editor's work area).
- Locate the first qualified element: CUSTOMER_ORDER.
- Place your cursor where you want to add the statement (just between the double-quote and the closing angle bracket ( > ) at the end of the line)
- Enter a space.
- Activate the code assistant with the combination:
Ctrl + spacebar
You will get a code completion dialog.
- Perform the Ctrl+space operation twice, once for the max_occurs, and again to add the unbounded statement. The line now appears as:
<xs:element form="qualified" name="CUSTOMER_ORDER" maxOccurs="unbounded"> - Follow Steps 5-9 for the second qualified element, CUSTOMER_ORDER_LINE_ITEM.
- Save the CUST_ORDERS_ITEMS.xsd file.
File > Save
(The modified schema file appears below.)
- Close the file.
File > Close
CUST_ORDERS_ITEMS Schema (XSD File)
<?xml version="1.0" encoding="UTF-8"?>
<xs:schema targetNamespace="custOrdersItems" xmlns:xs="http://www.w3.org/2001/XMLSchema">
  <xs:element name="CUST_ORDERS_ITEMS">
    <xs:complexType>
      <xs:sequence>
        <xs:element name="CUSTOMER_ID" type="xs:string"/>
        <xs:element name="FIRST_NAME" type="xs:string"/>
        <xs:element name="LAST_NAME" type="xs:string"/>
        <xs:element name="CUSTOMER_SINCE" type="xs:date"/>
        <xs:element name="EMAIL_ADDRESS" type="xs:string"/>
        <xs:element name="TELEPHONE_NUMBER" type="xs:string"/>
        <xs:element name="SSN" maxOccurs="1" minOccurs="0" type="xs:string"/>
        <xs:element name="BIRTH_DAY" maxOccurs="1" minOccurs="0" type="xs:date"/>
        <xs:element name="DEFAULT_SHIP_METHOD" maxOccurs="1" minOccurs="0" type="xs:string"/>
        <xs:element name="EMAIL_NOTIFICATION" maxOccurs="1" minOccurs="0" type="xs:short"/>
        <xs:element name="NEWS_LETTTER" maxOccurs="1" minOccurs="0" type="xs:short"/>
        <xs:element name="ONLINE_STATEMENT" maxOccurs="1" minOccurs="0" type="xs:short"/>
        <xs:element name="LOGIN_ID" maxOccurs="1" minOccurs="0" type="xs:string"/>
        <xs:element form="qualified" name="CUSTOMER_ORDER" maxOccurs="unbounded">
          <xs:complexType>
            <xs:sequence>
              <xs:element name="ORDER_ID" type="xs:string"/>
              <xs:element name="C_ID" type="xs:string"/>
              <xs:element name="ORDER_DT" type="xs:date"/>
              <xs:element name="SHIP_METHOD_DSC" type="xs:string"/>
              <xs:element name="HANDLING_CHRG_AMT" type="xs:decimal"/>
              <xs:element name="SUBTOTAL_AMT" type="xs:decimal"/>
              <xs:element name="TOTAL_ORDER_AMT" type="xs:decimal"/>
              <xs:element name="SALE_TAX_AMT" type="xs:decimal"/>
              <xs:element name="SHIP_TO_ID" type="xs:string"/>
              <xs:element name="SHIP_TO_NM" type="xs:string"/>
              <xs:element name="BILL_TO_ID" type="xs:string"/>
              <xs:element name="ESTIMATED_SHIP_DT" type="xs:date"/>
              <xs:element name="STATUS" type="xs:string"/>
              <xs:element name="TRACKING_NO" maxOccurs="1" minOccurs="0" type="xs:string"/>
              <xs:element name="DATE_INT" maxOccurs="1" minOccurs="0" type="xs:long"/>
              <xs:element form="qualified" name="CUSTOMER_ORDER_LINE_ITEM" maxOccurs="unbounded">
                <xs:complexType>
                  <xs:sequence>
                    <xs:element name="LINE_ID" type="xs:string"/>
                    <xs:element name="ORDER_ID" type="xs:string"/>
                    <xs:element name="PROD_ID" type="xs:string"/>
                    <xs:element name="PROD_DSC" type="xs:string"/>
                    <xs:element name="QUANTITY" type="xs:integer"/>
                    <xs:element name="PRICE" type="xs:decimal"/>
                    <xs:element name="STATUS" type="xs:string"/>
                  </xs:sequence>
                </xs:complexType>
              </xs:element>
            </xs:sequence>
          </xs:complexType>
        </xs:element>
      </xs:sequence>
    </xs:complexType>
  </xs:element>
</xs:schema>
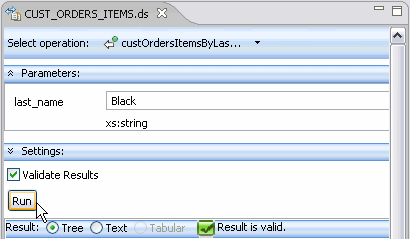
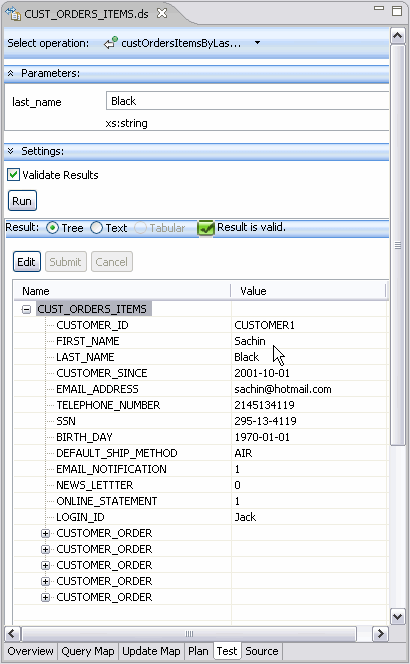
Testing Your Data Service Function
Having created a parameterized read function for your logical data service, you can now test it.
- Click the Test tab.
- Using the dropdown in the Select operation field, choose the function:
custOrdersItemsByLastName(string)
- Enter:
Black
as the last name parameter.
Entries are case-sensitive. - Click Run. Your project should republished successfully and your data then appear.
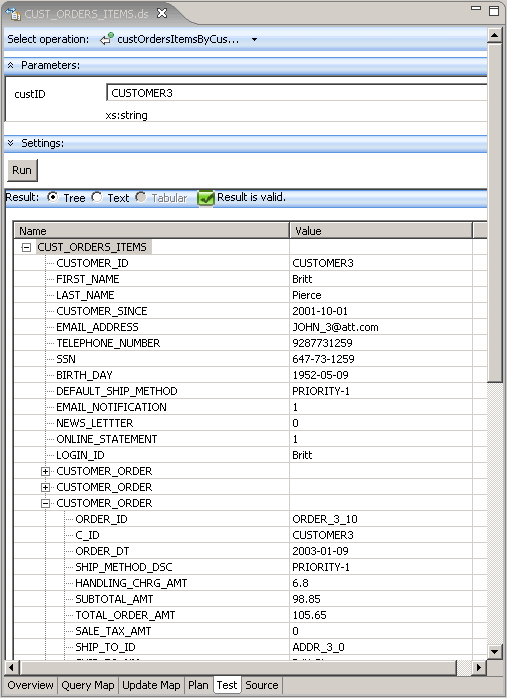
- Click the + to the left of CUST_ORDERS_ITEMS to view your data in Tree format. Notice that all the customer's orders are listed under customer information. If you open CUSTOMER_ORDER you will see that items for each order are also listed.
Testing a Parameterized Query
View Test Run Results
Test results from this function can be viewed in two ways:
- Tree
- Text

The Tabular option is only available for flat (non-nested) results.
Test Run Results in Tree Style Format
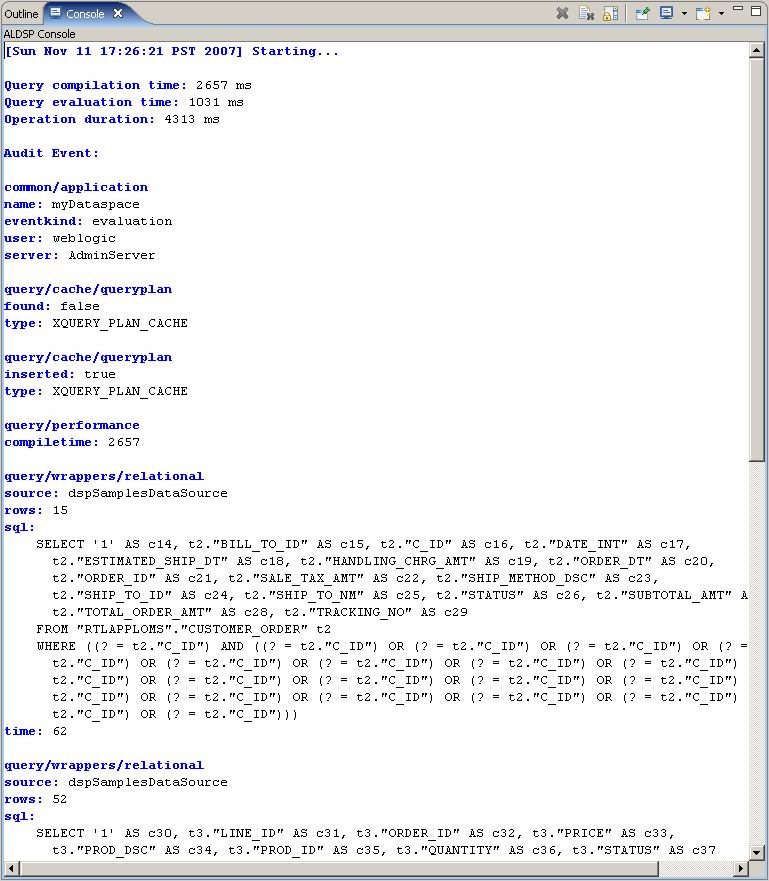
Review Test Run Information
When a query is run in the Test editor, you will often be able to access information on your query's performance and the generated SQL (in the case of relational data). Even if a test is unsuccessful, the attempted execution may generate useful audit event statistics.
Query Statistics in the Console Window
The Console window will always contain information on a successfully executed query. Access the Console with:
Window > Show View > Other... > General > Console
Sample console output is shown below.
Query Details in the Console Window
Adding Create-Update-Delete Functions to Your Data Service
You can also edit results in the Test area. In other words, you can update your data.
To do this an update procedure based on your data service must exist. Until then, the Edit, Submit and Cancel buttons at the bottom of the Test mode work area (  ) will be grayed out.
The easiest way to create an update procedure for your logical data service is to generate a default update map procedure. When you do this you will also be given the option of creating delete and insert procedures.
To add the new procedures:
- In the Overview tab, right-click in the work area choose Add Update Map Procedures...

- Leave the default Add and Primary checkbox options selected for each function.

Notice that the procedures are added to your data service.
Update Map Procedures
Updating Your Results
Now that you have an updateCUST_ORDERS_ITEMS procedure, you can update data -- either through the Test tab or through authorized client applications. Here are the steps:
- Click on the Test tab and scroll to the top of the window.
- From the Select operation dropdown select the createCUST_ORDERS_ITEMS(CUST_ORDERS_ITEMS() operation to review the generated type.
- From the Select operation dropdown select the read function custOrdersItemsByLastName().
- Run the function using Black as the last_name value.
- Your project may need to be saved.
- Click Edit.
- Expand the top element in the CUST_ORDERS_ITEMS tree.
- Change the customer's first name from "Jack" to "Sachin" using the built-in line editor. Optionally change the email address as well.
- Click the Submit button at the bottom of the work area. A message indicating that your data has been successfully submitted appears.
Changing an Element in Test View
- Re-run your function to see that the first name field reflects the changes you made.
Reviewing the Query Plan
After a data service has been successfully published, the query plan for the service's read functions can be examined through the Plan tab. The plan can be display in tree or text mode.
- Click the Plan tab.
- Choose the custOrdersItemsByLastName(string) function from the Select operation dropdown.
- Click Show Query Plan.
Tree View of Query Plan

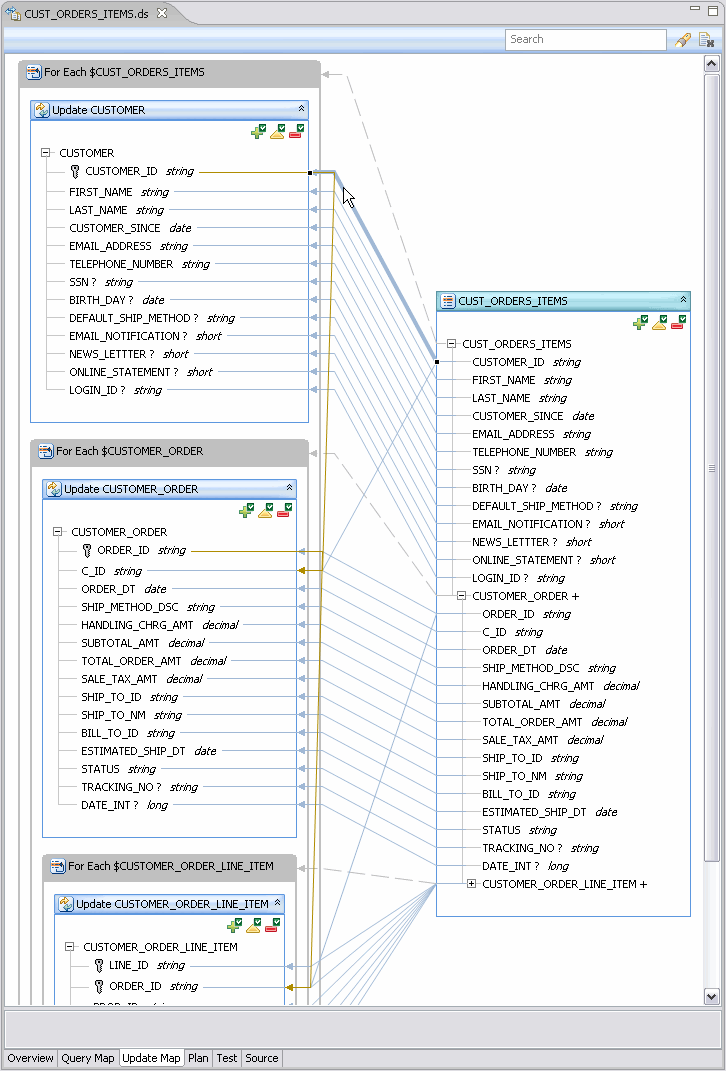
Reviewing the Update Map
After an entity data service is successfully published and contains an update function, its update map can be inspected and, as necessary, edited.
- Click the Update Map tab.
CUST_ORDERS_ITEMS Update Map
| For more information see: Understanding Update Maps |
Archiving Your Project
You can save your entire project to a ZIP file. Then, when you need to load it again, you can do so with a simple Import operation.
| Other examples in the Oracle Data Service Integrator documentation use this or similar examples, so having this project available will be make it easier to experiment with other Oracle Data Service Integrator faculties. |
- In Project Explorer, right-click on the myDataspace Project.
- Choose Export.
- In the Export dialog choose:
General > Archive File

Saving Project to a ZIP File
!datasrvc:images-datasrvc^Saving Project to a JAR File.gif
thumbnail! - In the Archive file dialog the myDataspace project is pre-selected. Browse to the location where you want to put your archive file.
- Name your file:
myDataspace
Leave all other options unchanged.
- Click Save.
Creating the Archive File
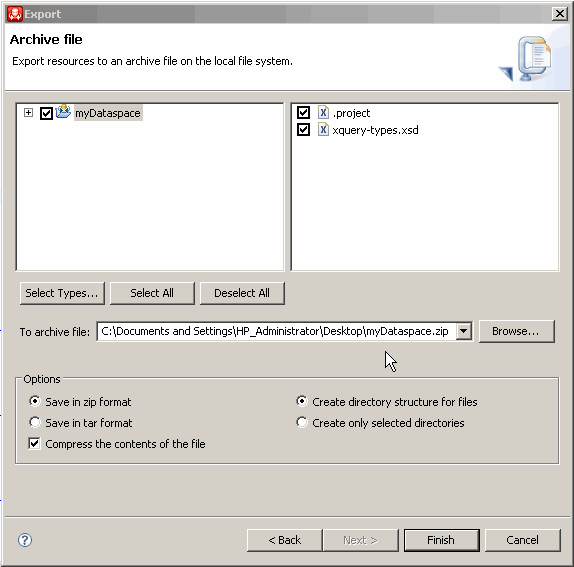
A file myDataspace.zip will be created in the directory you specified.
Summary
Congratulations! In just a few minutes you have:
- Started Oracle Data Service Integrator.
- Created several physical data services based on existing data.
- Created a logical data service based on elements from three physical sources.
- Build a function to retrieve based on information on a particular customer, the customer's orders, and each item in each order.
- Created an XML Type based on the Return type of your function.
- Modified the XML Type to better support a master-detail arrangement of information.
- Tested your results.
- Edited your results.
- Viewed the query plan and the updated map.
- Create an archive file of your dataspace.
About 150 lines of XQuery have been generated.